
HOUDINI - PARTICLES SIMULATION 2
(POP COLOR/POP GROUP)
INTRODUCTION
In this module, we are going to dive into some more concepts of particles simulation and how we can apply them. We are going to cover these aspects in this section:
1. POP Color
1. POP Color
2. POP Group
3. POP Replicate
Without wasting much time, let's jump right into it.
POP COLOR AND POP GROUPS
Like we've learnt in the last module, let's quickly setup a basic particles simulation inside a dopnet node;

Let's also introduce some pop forces and a pop drag into the setup, and tweak until you have a desired result. For us, we removed the gravity and used a pop force as a local gravity instead (temporarily disabled for now), and then a pop force to introduce some noise into the particles, and a pop drag to serve as air resistance. We ended up with something like this:

Right now, we are seeing the particles as this boring white color. If we want to change the color/appearance of the particles in the viewport, we will use a pop color node for that. (Note however that this node will not affect the final render of the particles because we will still need to properly assign a material to the particles for rendering). We assigned a constant red color to the particles.

We can also choose to assign a different color type by changing the color type parameter from constant to either random, ramp, or blended. These are the four different color types we have on this node.
If we use a ramp color type for example, we will have something like this:
If we use a ramp color type for example, we will have something like this:

Let us change it back to constant color so we can talk about pop group.
We can do a lot of things with the pop group node. We can use this node to assign particles into a named group after the particles fulfill a condition set on the group (see this as a sort of criteria for the particles joining the group).
When the particles fulfill the conditions we give this group, they would be added into the group. For instance, if we give a condition that any particles whose velocity exceeds say 5 should be added to the group, when we simulate, the velocity of each particles are going to be calculated, and every particles whose velocities exceed 5 would then be added into the group. Then down the line, we can reference this group anywhere in our node setup, to achieve some desired effects.
To really understand this, let us do an effect such that after the particles achieve say 1 second of their lifespan, they should change from red to yellow color.
Let's start by creating a pop group node renamed as "age group".

As we can see, this pop group node uses a VEXpression under the 'Rule' tab. This is where we can use VEXpressions to set certain rules and conditions which the particles must fulfill before being added to the group.
If we enable this Rule tab, we can now write the conditions in the VEXpression. By default, every particles are members of this group until a condition is introduced.
Next, let us write the following conditions in the VEXpression:
if(@age>1)
ingroup = 1;
This statement will now assign particles whose ages exceed 1s into the group.

Next, let us add another pop color node after the pop group node and set it to yellow, which is the color we want the particles to change to. Then we will enable the 'group' parameter and choose the "age_group" we created above.
Immediately, we will see the particles whose ages is greater than 1 change colors to yellow.

Like we see on the pop group node, there are several tabs. We've taken a look at how the Rule tab works. Let's do something with the Bounding tab now. If we enable the bounding box, we will see it in the viewport. We can scale it up and reposition it wherever we want.
Similar to what we did with the Rule, we can give this group a name, say "bounding_box", and then any particles that pass through the bounding box should change color to yellow. All we need to do is to specify the group name in the yellow color node (As a way of housekeeping and ensuring things work properly, we should always keep the effect result node after the pop group), and we would achieve similar result.

With the random tab, we can use this to assign random particles into the named group, and when we call this group later in the node setups, these randomly assigned particles would take part in the effect we are creating.
If we lower the chance, that means the chances of more particles added to the group will be lesser, and if we increase it, the chances of more particles added to the group will increase.
We will see in the result below that when we set the chance to 0.2, about 20% of all the particles were added to the group and it's those 20% that their colors change to yellow.

We can also combine the effect results from each pop nodes. For example, if we change the first yellow color to green after age of 1 for each particle, we will get the following result:

We can also enable the 'source group' attribute on the pop group node to use an existing group as a source.
For example, if we create a random pop group and enable the source group and set it to the age group, that means only the particles who are already members of the age group will take place in the effect we want to achieve with the random group, that is, change the color of randomly assigned particles from the age group to a blue color.

Let's see a practical application of this pop group node.
Suppose we add two pop wind nodes to blow the particles in different directions and we want some particles to blow in one direction, and some other particles to blow in a different direction, we can assign which of the group of particles that will actually be affected by the two wind nodes.
On the first pop wind, we will make it blow in the +x direction, and on the second pop wind node, we will make it blow in the -x direction.
Then on the first pop wind node, we will assign the random group earlier created, and on the second pop wind node, we will assign the age group earlier created. We will get the following result:

Now, this should really solidify our understanding of how this pop group works. This node is very important because we can create different kind of groups to achieve different kind of effects.
POP REPLICATE
POP Replicate is a very important node for streaming particles in Houdini. In this section, we will look at how to create a basic fireworks effect using this pop replicate, so let's get into it.
As usual, let's quickly do a basic particles setup with a dopnet;

Let's also add a camera in the object level and set the following translation values for it and lock them:

Let's get back into the dopnet node.
Let's do the following settings on the poplocation node:


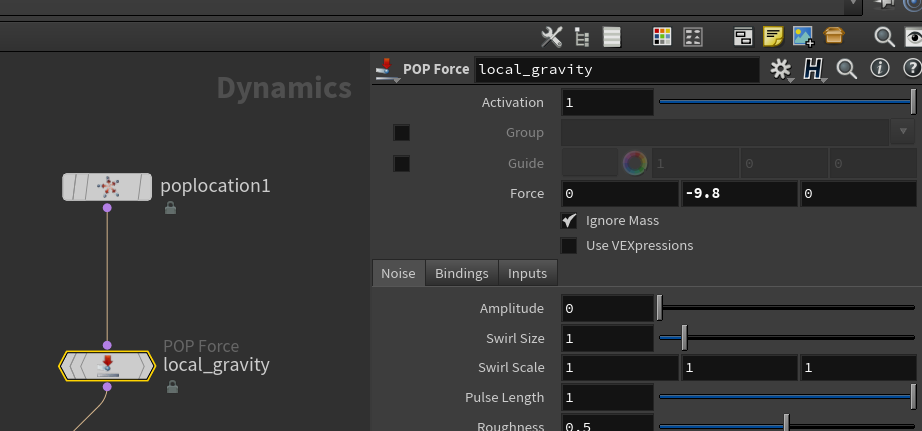
Let's add a pop force node and use it as a local gravity force, we will set it's value like below:
If we play the simulation, we will see the particles streaming out based on our settings.

What we want to do next is to add a trail to each particles, and whenever they die, that trail will create burst of particles like a firework explosion.
To create the trail, we will use the pop replicate node, so let's create it and connect it like below:

If we play again, we will see a burst of particles coming out in the shape of a sphere.

Let's make the following changes on each tabs of the pop replicate node:


If we play the simulation again, we should be getting a proper stream now:
Tip: If the particles points are too big in the viewport, you can reduce their size in the display settings by pressing D on the keyboard, and under the geometry tab, you can reduce the point size


Right now, the local gravity on our pop location node does not affect the trails, so we will need to add a local gravity force (pop force node) for the pop replicate as well. Let's also add a pop wind node and a pop drag node.
We will then reconnect everything as follows:

We will keep the gravity value on the trails very small, say -0.5 so that it has a small pull on the trails.
We will leave the pop drag value at the default.
Let's do the following settings on the pop wind to break the trails up a bit;


Next, let us add the particle bust. What we want to do is, at the death of each particles, they should be resolved, so we will use a pop group for this purpose. We already have a comprehensive knowledge of how the pop group node works.
Let's connect it like this:

We will use the Rule tab for this, so let's write the VEXpression below and press CTRL + ENTER button on the keyboard to activate it;

Let's create another pop replicate node which would be the new particles generated at the death of the initially emitted particles.
We will also add a pop drag node to slow down the movements of the particles bust, and lastly, we will add another pop force to serve as local gravity for the bust particles.
Our node setup should now look like this:

Let's do the following settings on the new pop replicate node:


On the pop drag node, let's have the following settings:

On the pop force node, let's do the following settings:

If we play the simulation, we should get the following fireworks effect:


